Drawing diagrams with RFFlow is easy. To get acquainted with the program, download
the free trial version and then try out the steps on this page.
The RFFlow in-program Help also includes tutorials on drawing a flowchart and
drawing an organization chart. Run RFFlow and click Help, RFFlow
Help, Contents, and Tutorial: Drawing a Flowchart or Tutorial:
Drawing an Organization Chart.
You can also view and print your own RFFlow Quick
Reference card or the entire RFFlow User's Guide.
Run RFFlow
Click the
Windows Start button, scroll, and click
RFFlow.
Draw a Shape
Drag a shape from a stencil into your chart. In the dialog box that appears,
type text into the new shape and then click
OK.
Access More Shapes
Click the
More Shapes button

to display the Stencils and Shapes dialog box. In this dialog box, click the
name of a stencil in the list to view its contents. Follow the instructions in
this dialog box to add entire stencils or individual shapes to your chart.
Draw a Line
To draw one line, simply drag the line from a stencil into your chart. Then
drag the middle of the line to move it or drag one of the handles to adjust
its length.
To draw several lines, click on a line in a stencil. In your chart, drag the
mouse to draw the line. You can continue to draw lines until you click on
another shape or click the button
To automatically connect shapes, click the
Auto Connect button

and then click on any two shapes in your chart. RFFlow will draw a line to
connect them. Leave the "Autoconnection Dialog" open as you do this.
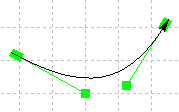
Draw a Curve
Click on a curve in a stencil or drag the curve into your chart. Drag the
center of a curve to move it or drag the handles to adjust the curvature.
Move
Simply drag a shape, line, or curve to move it to a new location. No
selection is necessary. To move a shape and maintain its connection to other
shapes, click the
Keep Connected button

.
Then drag the shape to a new location and the connecting lines will stretch or
shrink. To move several objects at once, first select them. Then drag any of
the selected objects and they all will move.
Select
To select a group of objects, click down on an empty part of the drawing
area and drag the mouse diagonally, drawing a selection rectangle around the
objects. Or, hold down the SHIFT key or CTRL key while clicking on objects. To
select all the objects in a chart, click Edit, Select All.
Selection is used to move, duplicate, or delete several objects at once. It is
also used to copy objects to the Windows Clipboard.
Duplicate
Right-click on an object or group of selected objects and click Duplicate
in the pop-up menu. You can also duplicate objects by moving them with the
CTRL key held down.
Delete
Right-click on an object or group of selected objects and click Delete
in the pop-up menu.
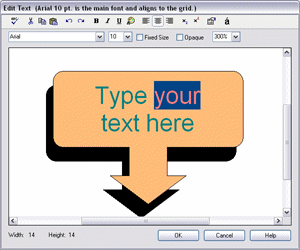
Edit Text
Right-click on a shape, line, or curve, and click Edit Text in the
pop-up menu. Or, double-click on an object to edit its text. In the dialog box
that appears, change the text as you would in a word processor, and then click
OK.
Center the Chart
To automatically center the chart on the page, click the Center button.

Scroll and Zoom
To view a portion of your chart that is off the screen, drag with the
right mouse button. You can also scroll the screen with the arrow keys or with
the scroll bars. To change the zoom, click the
Zoom Out

or
Zoom In 
buttons.
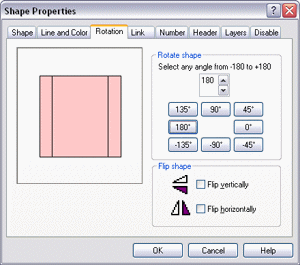
Change Shape Properties
To view or change the properties of an object or group of selected objects,
right-click on the object and click
Properties in the pop-up menu. In
the Shape Properties dialog box that appears, click on the appropriate tab and
make your changes.
Copy and Paste
You can copy and paste your chart into any Windows application.
In RFFlow, select the chart and click
Edit,
Copy or

.
Switch to the destination application and click
Edit,
Paste
or

.
The chart is now part of that document. To edit the embedded chart,
double-click it.
Size a Line or Curve
Left-click on a line or curve to display the
handles. Drag the handles to change the length or direction of a line or
curve.
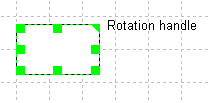
Size a Shape
Left-click on a shape to display the handles. Drag
the handles to change the size of a shape. Drag the rotation handle to rotate
a shape.
Insert a Picture
To insert a picture from a file, click Insert in the main menu of RFFlow and
Picture From File.
Export a Chart as a Picture
One way to share your charts with others is to save the chart as a PNG file. Then attach it
to an email. Everyone can open PNG (Portable Network Graphics) files. To save your chart as
a picture, click
File,
Save As and choose png, gif,
jpeg, html, emf, bmp, etc., in
Save as type:. You can also print your chart using
Microsoft
Print to PDF to generate a PDF file.
Set up Pages and Page Orientation
To show the boundaries of one or more pages, click
View,
Pages. To quickly switch between portrait and landscape,
click the
Orientation button

.
Line up Shapes
Select the shapes, click the
Align button

,
and choose an alignment style. The shapes will be aligned to the top or
leftmost shape.
Find and Replace Text
To find and replace a word in your chart, click the
Find button

. Then type the word you are looking for and it's
replacement.
Create Custom Shapes
You can draw your own shapes by combining any of
the shapes and lines in RFFlow. Select these objects, right-click on one of
them, and choose Add To Stencil. Another way to draw custom shapes is
to use RFShape, a program that comes with RFFlow. Click Tools, Run
RFShape.
Get Assistance
To access a complete in-program manual, click
Help
in the main menu and
RFFlow Help. You can also print documentation from
www.rff.com/documentation.
To contact us for assistance with the full or trial version of RFFlow, go
to
Support.